Imagine the structural failure of a weak tuber. You lift it, expecting a sturdy vessel of molten cheese and salt, only to have the entire infrastructure collapse into a sad, starchy heap. This is a breach of culinary integrity. To achieve true Potato Skin Security, we must treat the Russet potato not as a vegetable, but as a thermal housing unit. We are looking for a structural integrity that rivals aerospace engineering; a crisp, dehydrated exterior shell capable of supporting a high-viscosity payload of cheddar and rendered swine. The sensory profile must be a violent contrast between the crystalline crunch of the epidermis and the pillowy, aerated remnants of the interior flesh. We are here to audit the humble potato skin and elevate it to a fortress of flavor. This requires precise moisture management and a deep understanding of starch retrogradation. If your potato skins are limp, you have failed the audit. If they are greasy, your security is compromised. Let us rebuild the potato from the skin up, ensuring every bite is a tactical success in texture and temperature.
THE DATA MATRIX
| Metric | Specification |
|---|---|
| Prep Time | 20 Minutes |
| Execution Time | 75 Minutes |
| Yield | 12 Loaded Shells |
| Complexity (1-10) | 4 |
| Estimated Cost per Serving | $1.15 |
THE GATHERS
Ingredient Protocol:
- 6 Large Russet Potatoes (approx. 1.8kg / 4 lbs)
- 60ml / 1/4 cup Extra Virgin Olive Oil
- 15g / 1 tbsp Kosher Salt
- 225g / 8 oz Sharp Cheddar Cheese, hand-grated
- 150g / 5.3 oz Thick-cut Bacon, diced
- 120ml / 1/2 cup Sour Cream
- 30g / 1/4 cup Fresh Chives, finely minced
- 5g / 1 tsp Smoked Paprika
Section A: Ingredient Quality Audit:
The primary failure point in Potato Skin Security is the selection of the tuber itself. Waxy potatoes, such as Red Bliss or Yukon Gold, contain too much moisture and insufficient starch to create a rigid, friable shell. If you are forced to use lower-starch varieties, you must extend the initial dehydration phase by 15 percent. Furthermore, pre-shredded cheese is a security risk. The cellulose anti-caking agents prevent the cheese from achieving a truly viscous and cohesive melt. Always grate your cheese from a block using a box grater to ensure a smooth, emulsified fat profile. If your bacon is too thin, it will incinerate before the fat can properly render. Opt for center-cut, thick-sliced pork to ensure a chewy yet crisp textural contrast.
THE MASTERCLASS
Step-by-Step Execution:
1. The Primary Thermal Cure
Scrub the potatoes and dry them obsessively. Rub the skins with olive oil and salt to initiate the dehydration process. Bake at 200C / 400F for 50 to 60 minutes until the internal temperature reaches 98C / 208F.
Pro Tip: Use a digital probe thermometer to verify the internal temperature. Reaching 98C ensures the starch granules have fully gelatinized, which is essential for a fluffy interior.
2. The Structural Excavation
Allow the potatoes to cool slightly so they can be handled. Slice them lengthwise. Use a spoon to scoop out the flesh, leaving a 5mm / 0.2 inch wall of potato against the skin.
Pro Tip: Use a bench scraper to clean your workstation of excess starch. Leaving exactly 5mm of flesh provides the necessary reinforcement for the skin without making the vessel too heavy or soggy.
3. The Secondary Crisp Protocol
Increase the oven temperature to 220C / 425F. Brush both the interior and exterior of the shells with oil. Place them hollow-side down on a wire rack set over a baking sheet and bake for 10 minutes. Flip and bake for another 5 minutes.
Pro Tip: Placing the shells on a wire rack allows for 360-degree hot air circulation. This maximizes the Maillard reaction across the entire surface area of the skin.
4. The Lipid Rendering
While the skins crisp, place the diced bacon in a cold saucier or skillet. Turn the heat to medium and cook until the fat has fully rendered and the bits are golden brown. Drain on paper towels.
Pro Tip: Starting with a cold pan allows the fat to melt slowly before the proteins sear. This results in a more uniform texture and prevents the bacon from curling excessively.
5. The Payload Integration
Fill each crispy shell with a generous amount of grated cheddar and the rendered bacon. Return to the oven for 3 to 5 minutes until the cheese is bubbling and slightly infused with the smoky aroma of the bacon.
Pro Tip: Use a digital scale to ensure even distribution of cheese across all shells. This guarantees thermal consistency during the final melt.
6. The Final Embellishment
Remove from the oven and top with a dollop of sour cream, a sprinkle of smoked paprika, and a shower of fresh chives. Serve immediately to maintain the heat-to-crunch ratio.
Pro Tip: Use a piping bag for the sour cream to achieve a professional, uniform aesthetic. Cold sour cream provides a necessary thermal contrast to the scorching hot potato shell.
Section B: Prep & Timing Fault-Lines:
Timing is the enemy of crispness. If you scoop the potatoes while they are too hot, the steam will condense back into the skin, causing structural softening. Conversely, if you wait until they are cold, the starch becomes resistant and difficult to scoop without tearing the "guard" layer. The sweet spot is 10 minutes post-oven. Another common fault is the "Soggy Bottom" syndrome. This occurs when shells are placed directly on a flat baking sheet, trapping steam underneath. Always use an elevated wire rack to ensure the bottom of the skin remains a high-security, crunch-positive zone.
THE VISUAL SPECTRUM
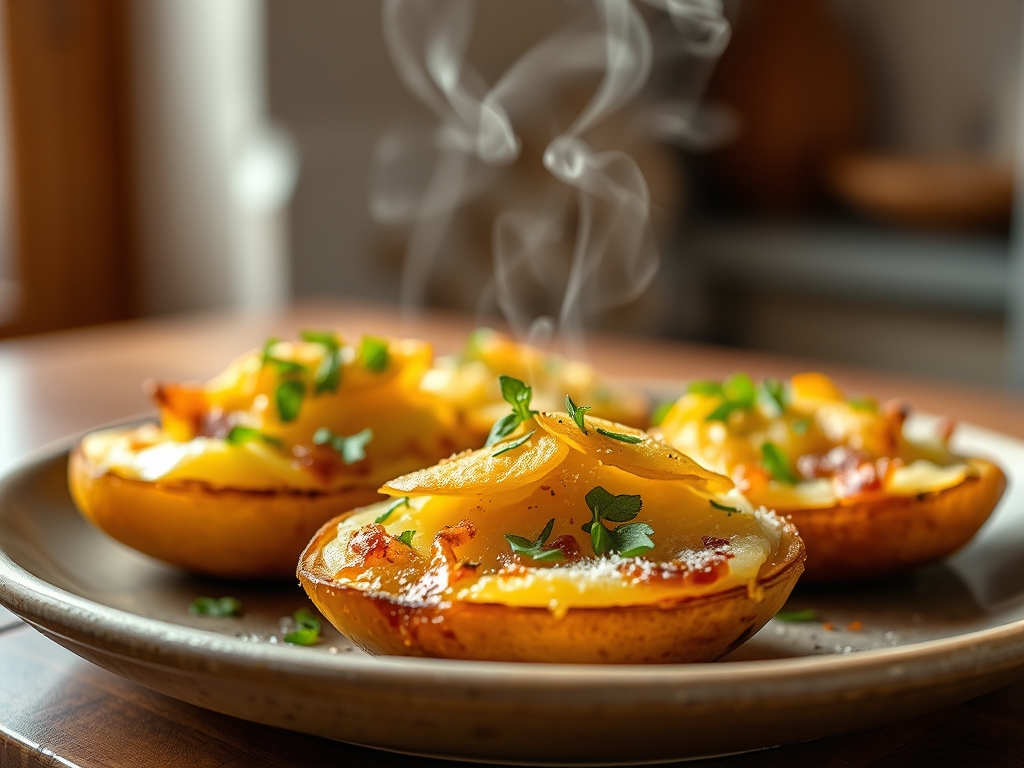
Section C: Thermal & Visual Troubleshooting:
Referencing the Masterclass photo, your potato skins should exhibit a deep mahogany hue on the edges with a golden, translucent sheen on the skin itself. If your skins appear pale or "dusty," you have under-oiled the exterior, failing to create a sufficient thermal barrier. If the cheese has separated into a greasy pool, your oven temperature was likely too high during the final stage, causing the emulsion to break. The chives should be a vibrant, electric green; if they look dull or wilted, they were applied too early or chopped with a dull knife, bruising the cell walls. The sour cream should hold its shape, indicating it has not yet reached its melting point against the hot potato.
THE DEEP DIVE
Macro Nutrition Profile:
A single loaded shell (approx. 150g) contains roughly 320 calories. You are looking at 18g of fat, 28g of carbohydrates, and 12g of protein. While starch-heavy, the skin provides a significant amount of dietary fiber and potassium.
Dietary Swaps:
- Vegan: Substitute the cheddar with a cashew-based nutritional yeast sauce and use coconut bacon or smoked tempeh. Use a silken tofu and lemon blend to mimic the viscous nature of sour cream.
- Keto: This is difficult given the tuber base, but you can apply this exact protocol to hollowed-out zucchini boats or thick slices of roasted cauliflower.
- GF: This recipe is naturally gluten-free, provided your smoked paprika and bacon are not processed with wheat-based anti-caking agents.
Meal Prep & Reheating Science:
To maintain molecular structure when reheating, avoid the microwave at all costs. The microwave agitates water molecules, which will steam the skin from the inside out and destroy the crispness. Instead, use an air fryer or oven at 200C / 400F for 8 minutes. This re-dehydrates the surface and restores the structural integrity of the Potato Skin Security system.
THE KITCHEN TABLE
Why are my potato skins chewy instead of crispy?
You likely skipped the secondary bake or used a low-starch potato. The secondary bake is vital to evaporate residual moisture from the "guard" layer. Without it, the skin remains hydrated and tough.
Can I use an air fryer for the whole process?
Yes. The air fryer is a convection powerhouse that excels at Potato Skin Security. Reduce the temperature by 20 degrees and check for doneness 10 minutes earlier than the standard oven protocol.
How do I stop the cheese from sliding off?
Ensure you have created a slight "well" when scooping the flesh. If the surface is too flat, the melting cheese will lose its anchor. A slight indentation keeps the payload secure.
What is the best way to cut chives?
Use a very sharp chef's knife and a circular motion. Never "chop" straight down, as this crushes the delicate stalks. You want clean, translucent rings that aerate the dish with fresh onion scent.