The scent hits you before the steam does. It is a heavy, primal aroma of rendered bovine lipids and caramelized mirepoix that signals the successful initiation of Pot Roast Braising. We are not merely cooking dinner; we are conducting a structural demolition of connective tissue. The chuck roast is a topographical map of collagen and muscle fibers that, under standard conditions, is as tough as a radial tire. However, through the application of liquid thermal saturation, we transform this rugged landscape into a succulent, fork-tender masterpiece. This process requires more than a recipe; it requires an infrastructure of heat, moisture, and time. We are talking about the slow, deliberate breakdown of tough proteins into gelatin, creating a mouthfeel that is both viscous and deeply satisfying. If your kitchen does not currently smell like a five-star steakhouse collided with a rustic French farmhouse, you have missed a critical step in the Maillard reaction. Strap in, because we are about to audit your culinary workflow and optimize your pot roast for maximum flavor density.
THE DATA MATRIX
| Metric | Specification |
|---|---|
| Prep Time | 30 Minutes |
| Execution Time | 3.5 to 4 Hours |
| Yield | 6 to 8 Servings |
| Complexity (1-10) | 4 |
| Estimated Cost per Serving | $4.50 – $6.00 |
THE GATHERS
Ingredient Protocol:
- 1.8 kg / 4 lbs Chuck Roast (well-marbled)
- 30 ml / 2 tbsp High-smoke point oil (Grapeseed or Avocado)
- 450 g / 1 lb Carrots, peeled and cut into 2-inch batons
- 450 g / 1 lb Yellow onions, quartered
- 340 g / 12 oz Celery stalks, thick slices
- 500 ml / 2 cups Beef bone broth (high gelatin content)
- 250 ml / 1 cup Dry red wine (Cabernet or Merlot)
- 60 g / 4 tbsp Tomato paste
- 4 cloves Garlic, smashed
- 3 sprigs Fresh thyme
- 2 sprigs Fresh rosemary
- 15 g / 1 tbsp Kosher salt
- 5 g / 1 tsp Black peppercorns, cracked
Section A: Ingredient Quality Audit:
If your chuck roast lacks significant intramuscular fat (marbling), the final result will be dry and stringy regardless of your technique. To fix lean meat, increase the "basting frequency" or add 30g of chilled butter to the sauce at the very end to emulsify and add artificial richness. If your wine is "corked" or overly acidic, it will ruin the braising liquid; always taste your wine before it hits the pan. If the broth tastes like salt water rather than beef, reduce it by half in a separate saucier before adding it to the roast to concentrate the solutes.
THE MASTERCLASS
1. Thermal Priming and Searing
Pat the beef bone-dry with paper towels and season aggressively with salt. Heat your Dutch oven over medium-high heat until the oil shimmers. Sear the meat for 5 to 7 minutes per side until a deep, mahogany crust forms.
Pro Tip: Use a digital scale to measure your salt precisely (1.5% of meat weight). The crust is the result of the Maillard reaction; if the pan isn't hot enough, the meat will steam in its own juices rather than brown.
2. Aromatics and Fond Integration
Remove the meat and set it aside. Toss in your onions, carrots, and celery. Use a bench scraper to move any stray vegetable bits and ensure even contact with the pan. Cook until the onions are translucent and the edges start to char.
Pro Tip: The brown bits stuck to the bottom of the pan are called "fond." This is concentrated flavor. Do not scrape them off yet; let the moisture from the vegetables naturally loosen them.
3. Deglazing the Infrastructure
Add the tomato paste and cook for 2 minutes until it turns a rusty brick color. Pour in the red wine and use a wooden spoon to deglaze the pan, scraping up every bit of fond. Reduce the liquid by half.
Pro Tip: Reducing the wine burns off the harsh ethanol notes and leaves behind the complex esters and tannins that provide the "backbone" of the sauce.
4. Liquid Thermal Saturation
Return the beef to the pot along with any accumulated juices. Add the broth until the liquid reaches halfway up the side of the roast. Add the garlic and herbs. Cover with a tight-fitting lid and place in a 150C / 300F oven.
Pro Tip: Total submersion is a mistake; it boils the meat. Halfway submersion allows the top of the meat to roast while the bottom braises, creating a superior texture.
5. The Resting Phase
Once the internal temperature reaches 95C / 203F, remove the pot from the oven. Let the meat rest in the liquid for at least 20 minutes before slicing or shredding.
Pro Tip: Resting allows the muscle fibers to reabsorb the viscous braising liquid. If you cut it immediately, the moisture will evaporate instantly, leaving you with dry fibers.
Section B: Prep & Timing Fault-Lines:
The most common failure in Pot Roast Braising is the "Premature Pull." If the meat is tough, it simply hasn't been in long enough for the collagen to convert to gelatin. Use a probe thermometer to verify the 95C threshold. Conversely, if the vegetables are mush, you likely added them too early. For pristine vegetables, add the carrots and celery halfway through the total cook time.
THE VISUAL SPECTRUM
Section C: Thermal & Visual Troubleshooting:
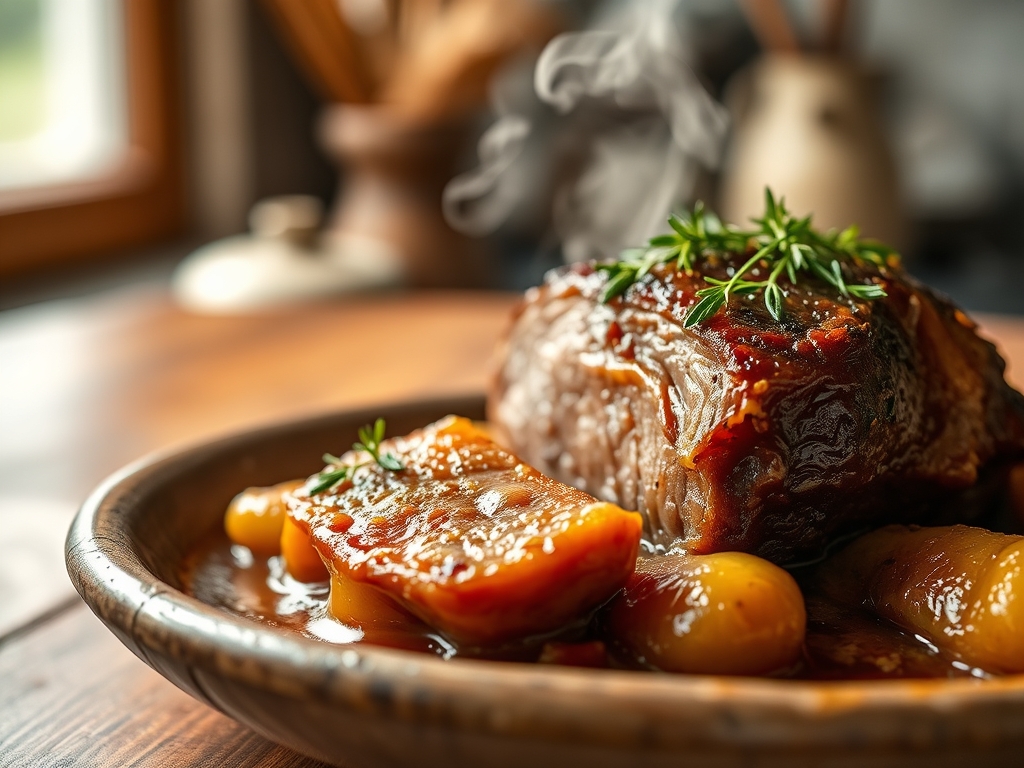
Review the Masterclass photo. Notice the deep, dark hue of the sauce; this indicates proper caramelization of the tomato paste and wine reduction. If your sauce looks pale or grey, you skipped the searing phase or failed to deglaze properly. If the meat looks "shreddy" rather than holding its shape, the temperature was likely too high, causing the fibers to explode rather than soften. To fix a thin, watery sauce, remove the meat and whisk in a slurry of cornstarch and water, then simmer until the sauce is glossy and coats the back of a spoon.
THE DEEP DIVE
Macro Nutrition Profile:
A standard 170g / 6oz serving provides approximately 450 calories, 35g of protein, 28g of fat, and 8g of carbohydrates (mostly from the root vegetables). It is a powerhouse of iron, zinc, and B12.
Dietary Swaps:
- Vegan: Swap the beef for large "steaks" of cauliflower or lion's mane mushrooms and use mushroom broth. Reduce cook time to 45 minutes.
- Keto: Omit the carrots and onions; replace with radishes and leeks. Ensure the wine is a very dry variety.
- GF: This recipe is naturally gluten-free provided your beef broth does not contain hidden wheat thickeners.
Meal Prep & Reheating Science:
Pot roast is actually better on day two. As it cools, the gelatin sets into a semi-solid state, further infusing the meat with flavor. To reheat, do not use a microwave; it toughens the proteins. Instead, place the meat and sauce in a covered pan over low heat to gently liquefy the fats and gelatin without overcooking the fibers.
THE KITCHEN TABLE
Why is my pot roast still tough after 3 hours?
Collagen breakdown is a function of time and temperature. If it is tough, the internal temperature hasn't stayed at the "sweet spot" (90C-95C) long enough. Put it back in; it is nearly impossible to overcook a chuck roast.
Can I do this in a slow cooker?
Yes, but you must perform the searing and deglazing steps in a skillet first. Simply dumping raw meat into a slow cooker results in a flat, one-dimensional flavor profile that lacks the complexity of the Maillard reaction.
What is the best wine for braising?
Choose a dry, medium-bodied red like a Cotes du Rhone or a Cabernet Sauvignon. Avoid "cooking wines" sold in grocery stores as they are loaded with excess sodium and lack the necessary acidity to balance the fats.
How do I make the sauce more "glossy"?
The secret is a "monte au beurre." Once the roast is done, remove it, strain the liquid, and whisk in two tablespoons of cold, cubed butter. This creates a stable emulsion that gives the sauce a professional, velvet finish.