Imagine the audacity of introducing a direct flame to a water-dense, leafy green. It sounds like a recipe for a soggy, wilted disaster; however, when we apply the principles of Grilled Romaine Tech, we are not just cooking salad. We are engineering a high-contrast sensory experience. The goal is a violent, short-burst thermal contact that triggers the Maillard reaction on the exterior ridges while maintaining a crisp, cool, and structurally sound core. You want that piquant char to hit the tongue first, followed immediately by the refreshing snap of the inner leaves. This is the ultimate technical audit of texture and temperature. We are looking for localized carbonization, not a total structural collapse. If you do this correctly, the romaine transforms from a mere vessel for dressing into a smoky, savory centerpiece that demands respect. If you do it wrong, you are serving hot compost. This audit ensures your kitchen infrastructure is prepared to handle the thermal load required to turn a head of lettuce into a culinary masterpiece.
THE DATA MATRIX
| Metric | Specification |
|---|---|
| Prep Time | 10 Minutes |
| Execution Time | 4 Minutes |
| Yield | 4 Servings |
| Complexity | 3 / 10 |
| Estimated Cost per Serving | $1.75 USD |
THE GATHERS
Ingredient Protocol:
- 2 Large Heads of Romaine Lettuce; halved lengthwise.
- 60ml / 4 tbsp Extra Virgin Olive Oil.
- 30ml / 2 tbsp Fresh Lemon Juice.
- 5g / 1 tsp Flaky Sea Salt.
- 2g / 0.5 tsp Freshly Cracked Black Pepper.
- 45g / 0.5 cup Shaved Parmesan Cheese.
- 15ml / 1 tbsp Balsamic Glaze; for the final drizzle.
Section A: Ingredient Quality Audit:
The primary failure point in Grilled Romaine Tech is moisture content. If your lettuce is limp before it hits the grates, the heat will turn it into a viscous sludge. To fix sub-par, wilted greens, utilize a cold-water shock. Submerge the heads in an ice bath for 15 minutes, then use a high-speed salad spinner or a pressurized air canister to remove every molecule of surface water. Surface moisture is the enemy of the sear; it creates a steam barrier that prevents browning. Furthermore, ensure your olive oil has a high enough smoke point. If using a delicate finishing oil for the sear, you risk acrid flavors. Switch to a refined olive oil for the thermal phase and save the robust, unfiltered oils for the post-heat application.
THE MASTERCLASS
1. Thermal Priming and Surface Prep
Before the lettuce ever touches the heat, you must calibrate your grill or cast-iron surface to a minimum of 450 degrees Fahrenheit. Use a digital infrared thermometer to verify the surface temperature across the entire cooking zone. While the steel heats, slice your romaine heads lengthwise, keeping the root end intact to maintain structural integrity. Brush the cut side lightly with oil using a silicone basting brush.
Pro Tip: Keeping the root intact prevents the leaves from fluttering and burning individually. The science here is thermal mass; the dense root acts as a heat sink, allowing the delicate leaves to withstand higher temperatures for a shorter duration. Use a bench scraper to ensure your cutting surface is clear of debris between slices.
2. High-Velocity Searing
Place the romaine cut-side down onto the preheated surface. Do not move the lettuce once contact is made. You are looking for a rapid sear that lasts between 60 to 90 seconds. Press down lightly with a heavy-duty grill press or a flat spatula to ensure maximum surface area contact with the heat source.
Pro Tip: This step relies on conduction. By applying pressure, you minimize the air gaps between the ridges of the lettuce and the heat, accelerating the caramelization of natural sugars. Monitor the edges with a saucier's offset spatula to check for the desired level of carbonization without overstressing the fibers.
3. The Acidic Infusion
Once the char is achieved, flip the lettuce for a mere 30 seconds on the rounded back side. Remove immediately from the heat and place on a chilled staging tray. Whisk your lemon juice and remaining oil in a small saucier or mixing bowl until you achieve a temporary emulsion. Drizzle this mixture over the charred ridges while the lettuce is still off-gassing steam.
Pro Tip: The residual heat allows the acidic lemon juice to penetrate the first few layers of the charred leaves, which helps to infuse the smoky flavor deeper into the plant tissue. Use a digital scale to ensure your oil-to-acid ratio is exactly 2:1 for optimal palate balance.
4. Final Texture Integration
Shave the Parmesan directly over the warm lettuce so it slightly softens but does not fully melt into a liquid state. Finish with the flaky salt and balsamic glaze. The glaze should be viscous enough to cling to the charred ridges rather than pooling at the bottom of the plate.
Pro Tip: The salt acts as a flavor bridge between the bitter char and the sweet balsamic. By using a microplane for the cheese, you increase the surface area of the dairy, allowing it to catch the heat and release aromatics faster than thick slices would.
Section B: Prep & Timing Fault-Lines:
The most common human error is the "Slow-Heat Crawl." If your grill is not hot enough, you will be forced to leave the lettuce on the heat for too long to get color. This results in the internal water boiling, which ruptures the cell walls and turns the romaine into a wet rag. Another fault-line is the "Post-Wash Drip." If you do not dry the lettuce completely, the oil will not adhere, and the water will boil on contact, steaming the lettuce instead of searing it. Always use a digital scale to measure your dressings; guessing leads to an oversaturated leaf that loses its verticality on the plate.
THE VISUAL SPECTRUM
Section C: Thermal & Visual Troubleshooting:
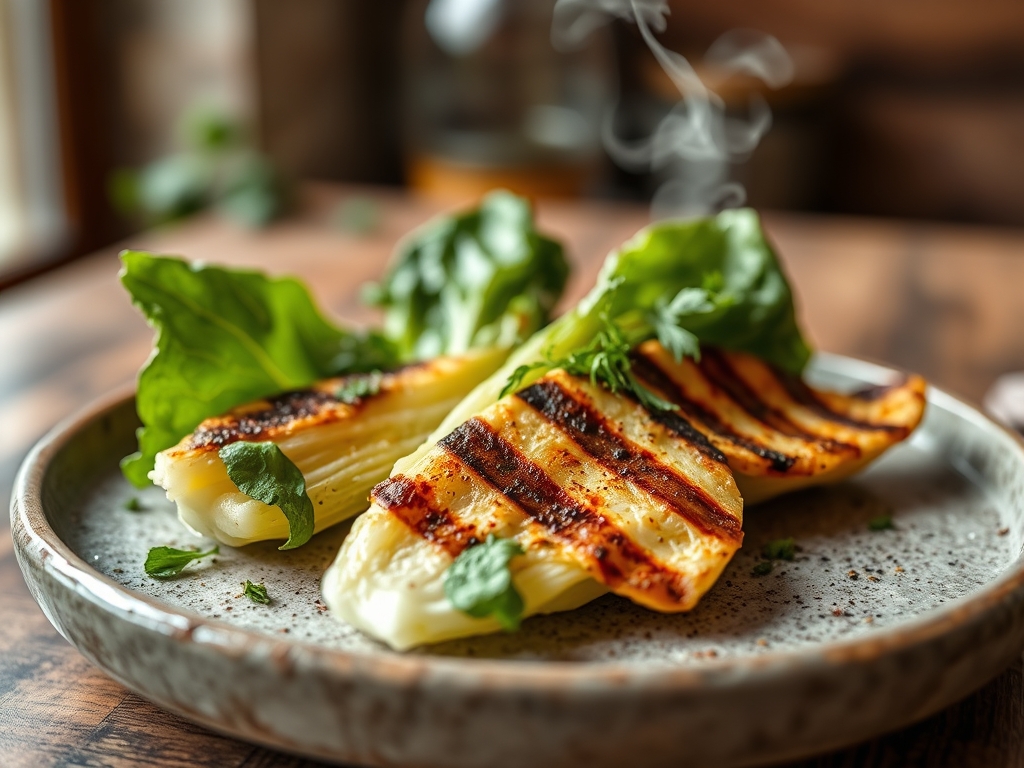
Referencing the Masterclass photo, your output should feature distinct, dark-brown to black grill marks contrasted against vibrant, lime-green inner leaves. If your lettuce looks dull or olive-drab, you have overcooked it; the chlorophyll has degraded due to excessive thermal exposure. If the browning is uneven, your cooking surface has cold spots or your romaine was not cut on a perfectly flat plane. To fix this, use a sharper knife to ensure a monolithic flat surface on the cut side. If the cheese looks like a solid yellow sheet, the lettuce was too hot when topped. Wait 30 seconds after removing from the grill before applying dairy to maintain the "snow-fall" visual aesthetic.
THE DEEP DIVE
Macro Nutrition Profile:
A single serving of this Grilled Romaine Tech setup provides approximately 160 calories. The breakdown is dominated by healthy fats from the olive oil (14g), with 4g of protein from the Parmesan and 6g of carbohydrates. It is a high-fiber, low-glycemic index dish that serves as an excellent metabolic primer.
Dietary Swaps:
For a Vegan protocol, replace the Parmesan with nutritional yeast or a cashew-based crumble to maintain the umami profile. For Keto adherents, increase the Parmesan and oil ratio. This dish is naturally Gluten-Free, provided your balsamic glaze does not use thickeners derived from wheat.
Meal Prep & Reheating Science:
Grilled romaine is best served immediately. However, if you must store it, do not dress it. Store the charred heads in an airtight container with a paper towel to absorb excess moisture. To reheat, do not use a microwave; the radiation will turn the leaves into mush. Instead, use a flash-broil in a toaster oven for 60 seconds to crisp the exterior without further cooking the core.
THE KITCHEN TABLE
Why is my lettuce soggy after grilling?
You likely lacked sufficient heat or failed to dry the leaves. High-intensity heat is required to sear the exterior before the internal moisture can migrate and collapse the cellular structure. Always pat dry before oiling.
Can I use iceberg lettuce instead?
Iceberg has a much higher water-to-fiber ratio. While possible, it lacks the structural ridges of romaine, making it prone to total liquefaction. Romaine is the superior choice for this specific thermal application.
How do I prevent the balsamic from running?
Ensure you are using a true glaze, which is a reduction. If your balsamic is too thin, simmer it in a saucier until it coats the back of a spoon. This increases viscosity for better plating.
Is the charred part safe to eat?
Yes. In this context, the char provides a bitter counterpoint to the sweet dressing. As long as you are not incinerating the entire head, the localized carbonization is a recognized culinary technique for flavor depth.
What is the best tool for the oil application?
A high-quality silicone brush is essential. It allows you to coat the intricate folds of the leaves without bruising the delicate tissue, ensuring an even layer of fat for the Maillard reaction.