Listen to the rhythmic slap of masa hitting the press. It is the sound of structural integrity. Most home cooks settle for the leathery, preservative-choked disks found in grocery aisles, but we are here to conduct a comprehensive Fresh Tortilla Audit. This is not merely a recipe; it is a thermal interrogation of corn and wheat. We are looking for the perfect puff, that momentary inflation where steam decouples the layers of dough to create a pocket of heat. The aroma must be earthy and alkaline, a direct result of the nixtamalization process that unlocks niacin and transforms humble maize into a nutritional powerhouse. If your current wrap cracks upon folding, you have failed the audit. We demand elasticity. We demand a delicate char that speaks of high-heat Maillard reactions without compromising the soft, pillowy interior. Whether you are deploying a traditional cast iron comal or a modern heavy-bottomed skillet, the goal remains the same: total structural dominance over the starch. Let us dive into the data and rebuild your tortilla infrastructure from the molecular level up.
THE DATA MATRIX
| Metric | Flour Tortilla Specification | Corn Tortilla Specification |
|---|---|---|
| Prep Time | 20 Minutes (Resting) | 10 Minutes |
| Execution Time | 2 Minutes per unit | 90 Seconds per unit |
| Yield | 12 Large Wraps | 16 Street Tacos |
| Complexity (1-10) | 6 (Gluten Development) | 4 (Hydration Management) |
| Estimated Cost per Serving | $0.12 | $0.08 |
THE GATHERS
Ingredient Protocol:
For the Flour Variant:
- 500g / 4 cups All-Purpose Flour (unbleached).
- 10g / 2 tsp Fine Sea Salt.
- 5g / 1 tsp Baking Powder (optional for extra loft).
- 80g / 1/3 cup Rendered Lard or Vegetable Shortening.
- 250ml / 1 cup Hot Water (approx. 60C / 140F).
For the Corn Variant:
- 300g / 2 cups Masa Harina (Nixtamalized Corn Flour).
- 350ml / 1.5 cups Warm Water.
- 5g / 1 tsp Sea Salt.
Section A: Ingredient Quality Audit:
The most common failure in the Fresh Tortilla Audit is improper fat integration or stale masa. If your flour tortillas are translucent and tough, your fat was likely too cold or poorly distributed. You must render or soften your fats until they are pliable enough to rub into the flour until it resembles fine breadcrumbs. This coats the flour particles and inhibits excessive gluten formation, ensuring tenderness. For corn, the "stale" factor is real. Masa harina is hydroscopic. If it has been sitting in a humid pantry, it will resist hydration. If the dough feels crumbly, add warm water one tablespoon at a time. If it is too viscous or sticky, you have over-hydrated; dust in more masa harina immediately to restore the balance.
THE MASTERCLASS
1. The Molecular Integration (Mixing)
Combine your dry ingredients in a large stainless steel mixing bowl. For flour tortillas, work the lard in with your fingertips or a pastry cutter until no large lumps remain. Slowly stream in the hot water while stirring with a wooden spoon. For corn, simply combine the masa and water until a cohesive dough forms.
Pro Tip: Use a digital scale for the water. Volumetric measurements are notoriously inaccurate due to how tightly flour is packed. Precise hydration ensures the dough is supple enough to aerate during the cooking phase.
2. The Gluten Calibration (Kneading)
Turn the flour dough onto a clean surface. Use a bench scraper to keep the surface tidy as you knead for 5 minutes. You are looking for a smooth, elastic surface. Corn dough does not require kneading for gluten, but it does need a 10-minute rest to allow the corn particles to fully absorb the moisture.
Pro Tip: Resting the dough is non-negotiable. It allows the gluten proteins to relax and the moisture to equalize. A rested dough will not "spring back" when you try to roll it out.
3. The Precision Division (Portioning)
Divide your dough into equal-sized balls. For flour, aim for the size of a golf ball; for corn, slightly smaller. Keep the dough balls covered with a damp lint-free towel to prevent a skin from forming.
Pro Tip: Use your bench scraper to cut the dough rather than pulling it. Tearing the dough damages the gluten strands you just worked so hard to build.
4. The Compression Phase (Pressing/Rolling)
For corn, use a heavy-duty tortilla press lined with two sheets of plastic (a cut-up freezer bag works best). For flour, use a tapered rolling pin to roll from the center outward, rotating the dough 90 degrees after every stroke to maintain a circular shape.
Pro Tip: If using a press, apply even pressure. If the edges of the tortilla are cracking, the dough is too dry. If it sticks to the plastic, it is too wet.
5. The Thermal Shock (Cooking)
Preheat a cast iron comal or saucier over medium-high heat. Place the tortilla on the dry, hot surface. For corn, flip after 30 seconds, then again after 60 seconds. For flour, wait for bubbles to form, flip, and press down gently with a clean cloth to encourage the puff.
Pro Tip: The "puff" is the ultimate indicator of success. It signifies that the exterior has seared quickly enough to trap the internal steam, effectively steaming the interior while searing the outside.
Section B: Prep & Timing Fault-Lines:
Timing is the silent killer of the Fresh Tortilla Audit. If you roll all your tortillas before you start cooking, they will dry out on the counter. The workflow must be a continuous loop: roll one, cook one. Furthermore, temperature control is vital. If your pan is too cold, the tortilla will dehydrate and become a cracker before it browns. If it is too hot, the exterior will burn before the starch gelatinizes. Aim for a surface temperature of 200C to 230C (400F to 450F).
THE VISUAL SPECTRUM
Section C: Thermal & Visual Troubleshooting:
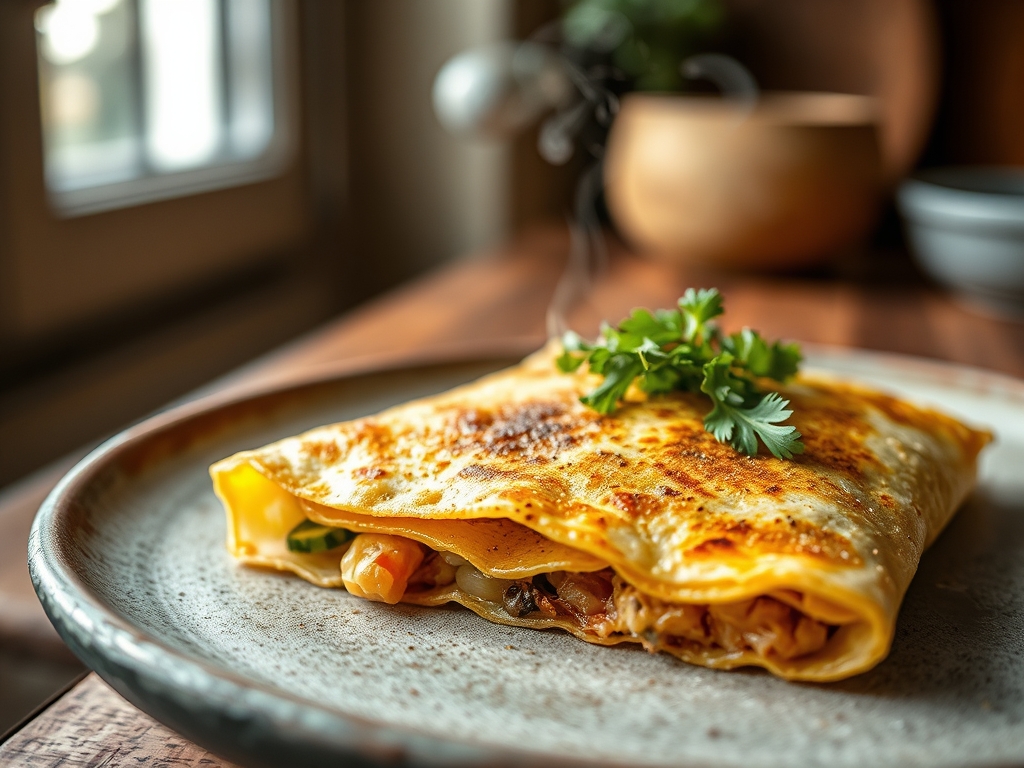
Look at the Masterclass photo above. Notice the "leopard spotting"—those small, dark brown toasted spots. These are the visual cues of a successful Maillard reaction. If your tortillas are a uniform, pale white, your heat is too low. If the spots are black and acrid, your heat is too high or your fat has a low smoke point.
If the tortilla looks "dusty," you used too much flour during the rolling process. Use the bare minimum to prevent sticking. For corn tortillas, if the edges look jagged and "toothed," your hydration was insufficient. The ideal tortilla should have smooth, clean edges and a slight sheen from the rendered fats.
THE DEEP DIVE
Macro Nutrition Profile:
A standard 50g flour tortilla contains approximately 150 calories, 4g protein, and 5g fat. A corn tortilla of the same weight is leaner, offering 110 calories, 2g protein, and 1g fat, while providing significantly more dietary fiber and magnesium.
Dietary Swaps:
- Vegan: Replace lard with high-quality avocado oil or coconut oil.
- Keto: Utilize almond flour mixed with xanthan gum and psyllium husk to mimic gluten elasticity.
- GF: Corn is naturally gluten-free, but ensure your masa harina is certified to avoid cross-contamination.
Meal Prep & Reheating Science:
To maintain molecular structure, store tortillas in a sealed container with a slightly damp paper towel. To reheat, avoid the microwave, which vibrates water molecules and turns starch "rubbery." Instead, flash-sear them on a hot dry pan for 15 seconds per side to re-activate the fats and crisp the edges.
THE KITCHEN TABLE
Why do my corn tortillas fall apart?
Usually, this is a hydration issue. If the masa is too dry, the "dough" cannot form a continuous matrix. Add warm water until the dough feels like play-dough and does not stick to your hands.
Can I use butter instead of lard?
Yes, but butter contains water and milk solids which change the texture. It will be more "biscuit-like." For the most authentic, flexible flour tortilla, rendered lard or shortening is the gold standard for lipid distribution.
How do I get the tortilla to puff?
The puff requires high heat and a thin, even roll. When you flip the tortilla the second time, give it a gentle press with a spatula. This forces the internal steam to spread and lift the top layer.
Why is my dough so springy and hard to roll?
The gluten is too tense. Cover the dough balls and let them rest for at least 30 minutes. This allows the protein bonds to relax, making the dough much more cooperative under the rolling pin.