Listen to the sound of high-velocity impact hitting a cutting board; that is the rhythm of a kitchen operating at peak mechanical efficiency. We are not merely cooking dinner; we are conducting a Chicken Schnitzel Audit to ensure structural integrity and maximum surface area for the Maillard reaction. Most home cooks treat breading like a suggestion, but in this theater of operations, it is a sophisticated engineering requirement. A perfect cutlet requires more than just heat. It demands the systematic destruction of muscle fibers to achieve a uniform thickness, followed by a multi-stage coating process designed to trap moisture while creating a shattered-glass exterior. If your breading is sliding off like a loose coat or your meat is as tough as a radial tire, your infrastructure has failed. We are here to recalibrate your process, optimize your thermal application, and turn a simple bird into a golden, crispy monument of culinary geometry. Prepare for a full-scale inspection of your poultry protocols.
THE DATA MATRIX
| Metric | Specification |
|---|---|
| Prep Time | 25 minutes |
| Execution Time | 12 minutes |
| Yield | 4 Units |
| Complexity | 4 / 10 |
| Estimated Cost per Serving | $3.50 – $4.50 |
THE GATHERS
Ingredient Protocol:
- 2 large (approx. 500g / 1.1 lbs) boneless, skinless chicken breasts.
- 125g / 1 cup all-purpose flour.
- 3 large eggs (approx. 150ml).
- 200g / 2 cups panko or fine breadcrumbs.
- 10g / 2 tsp kosher salt.
- 5g / 1 tsp freshly cracked black pepper.
- 5g / 1 tsp garlic powder.
- 250ml / 1 cup neutral high-smoke point oil (grapeseed or canola).
- 30g / 2 tbsp unsalted butter for finishing.
- 1 fresh lemon, sliced into wedges.
Section A: Ingredient Quality Audit:
Sub-par raw materials are the primary cause of structural collapse. If your chicken feels viscous or slimy, it indicates poor moisture retention; pat it dry with industrial-grade paper towels until the surface is matte. If using frozen poultry, ensure a full 24-hour thaw in a controlled 4C environment to prevent "weeping" during the fry. Are your breadcrumbs stale? Do not proceed. Stale crumbs lack the ability to aerate and will instead absorb oil, leading to a greasy failure. Revive them by pulsing in a food processor with a pinch of salt to create fresh edges. Finally, if your eggs are too thick, add 15ml of water to the wash to lower the surface tension, ensuring a thin, even adhesive layer rather than a gloopy mess.
THE MASTERCLASS

1. Mechanical Flattening and Fiber Realignment
Place the poultry between two sheets of heavy-duty plastic wrap. Using a professional meat mallet or the base of a heavy saucier, strike the thickest part of the breast with outward strokes. Aim for a uniform 6mm thickness across the entire plane.
Pro Tip: Uniformity is not about aesthetics; it is about thermal physics. Consistent thickness ensures that the edges do not overcook and dry out before the center reaches the safe internal temperature of 74C.
2. The Dredge and Adhesion Protocol
Set up three shallow trays. Season your flour with salt, pepper, and garlic powder using a digital scale for precision. Coat the chicken in flour, shake off every milligram of excess, then submerge in the beaten egg wash.
Pro Tip: The flour acts as a primer, absorbing surface moisture so the egg can bond. If you skip the "shake off" phase, the breading will steam from the inside out and separate from the meat, a phenomenon known as "blowout."
3. The Panko Encapsulation
Transfer the egg-coated poultry to the breadcrumb tray. Press the crumbs firmly into the meat with the palm of your hand to ensure maximum density. Use a bench scraper to lift the cutlets and transfer them to a wire rack to rest for five minutes before frying.
Pro Tip: Resting allows the starches in the breading to hydrate and bond with the proteins in the egg. This creates a reinforced molecular shield that stays attached during the turbulence of the fry.
4. Thermal Execution and Lipid Management
Heat your oil in a wide skillet until it reaches 175C. Carefully lower the cutlet away from your body. Use a spoon to continuously baste the top of the chicken with hot oil as it cooks. Add the butter in the final 60 seconds to render and infuse a nutty aroma.
Pro Tip: Basting creates a "souffle" effect where the breading puffs away from the meat slightly, creating air pockets that result in a lighter, crunchier texture.
Section B: Prep & Timing Fault-Lines:
The most common error is "crowding the pan." Adding too much cold protein simultaneously will cause the oil temperature to plummet, leading to oil absorption rather than searing. If your oil does not bubble vigorously upon contact, remove the meat immediately. Another timing error is the "delayed serve." Schnitzel has a half-life of approximately four minutes before ambient humidity begins to soften the crust. Have your plates warmed and your garnishes ready before the first cutlet hits the oil.
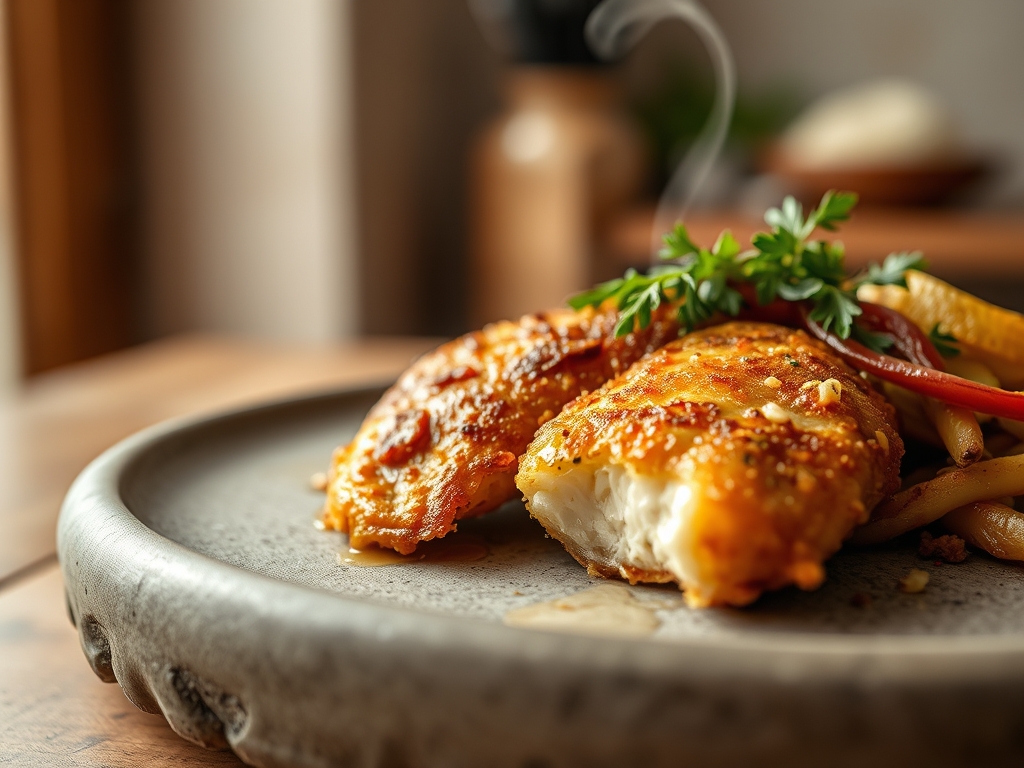
THE VISUAL SPECTRUM
Section C: Thermal & Visual Troubleshooting:
Look at the Masterclass photo above. Notice the "topographical browning." A perfect audit reveals a gradient of deep gold to amber. If your schnitzel is pale, your oil temperature was too low, failing to trigger the Maillard reaction. If it features black spots, your oil was contaminated with old flour particles; use a fine-mesh strainer to clean the oil between batches. If the breading looks "patchy," it indicates uneven pressure during the encapsulation phase. The lemon wedge is not just a garnish; the piquant acidity is chemically necessary to cut through the heavy lipids of the fried coating.
THE DEEP DIVE
Macro Nutrition Profile:
A standard 150g serving of audited chicken schnitzel contains approximately 420 calories, 35g of protein, 22g of carbohydrates, and 20g of fat. While high in protein, the breading and oil contribute significant caloric density.
Dietary Swaps:
- Vegan: Replace chicken with a 1cm slab of firm tofu or a large portobello mushroom. Use a flax-egg (ground flax and water) as the adhesive agent.
- Keto: Swap flour for coconut flour and panko for crushed pork rinds or almond meal.
- Gluten-Free: Utilize white rice flour and certified GF panko crumbs. The mechanical process remains identical.
Meal Prep & Reheating Science:
To maintain molecular structure when reheating, avoid the microwave at all costs. The microwave agitates water molecules, turning the breading into a soggy sponge. Instead, use an air fryer or oven at 200C for 5 minutes. This re-activates the fats in the crust, re-crisping the exterior without overcooking the internal proteins.
THE KITCHEN TABLE
Why is my breading falling off?
Usually, this is due to "wet" chicken or excess flour. Ensure the meat is bone-dry before the dredge and shake off all loose flour. The egg must touch the flour-dusted meat directly to create a permanent bond.
Can I bake this instead of frying?
You can, but the infrastructure will suffer. To achieve a similar result, toast your breadcrumbs in a pan with a little oil before breading. Bake at 220C on a wire rack to allow for 360-degree airflow and moisture evaporation.
What oil is best for a Schnitzel Audit?
Use an oil with a high smoke point like Grapeseed, Avocado, or Peanut oil. Avoid extra virgin olive oil; its low smoke point will cause it to break down and impart a bitter, burnt flavor to the delicate crust.
How do I know when it is done without a thermometer?
The "bubble logic" method is reliable. When the vigorous bubbling slows down significantly, it indicates that most of the surface moisture has evaporated and the meat is likely cooked through. However, a digital probe is always preferred.