Listen to the sound of a fork shattering through a structural masterpiece. That crystalline snap is not an accident; it is the audible signature of a successful lipid barrier deployment. We are here to talk about the holy grail of the bakery world: Pie Crust Flakiness. This is not a casual weekend project for the faint of heart. This is a high-stakes engineering feat where cold fats and gluten proteins engage in a tactical standoff. If you fail to manage your thermal variables, you end up with a leaden, soggy slab of regret. If you succeed, you create a laminated architecture so delicate it practically levitates off the plate. We are hunting for that specific, shattered-glass texture that only occurs when water vapor explodes between layers of encapsulated butter. It requires speed, precision, and a total refusal to let your ingredients reach room temperature. Welcome to the audit of your culinary life. We are about to turn your kitchen into a high-performance laboratory for pastry excellence.
THE DATA MATRIX
| Metric | Specification |
|---|---|
| Prep Time | 20 Minutes |
| Execution Time | 60 Minutes (plus chilling) |
| Yield | 2 Standard 9-inch Crusts |
| Complexity (1-10) | 7 |
| Estimated Cost per Serving | $0.45 |
THE GATHERS
Ingredient Protocol:
- 375g / 3 cups All-Purpose Flour (unbleached)
- 225g / 1 cup Unsalted European-Style Butter (minimum 82% butterfat)
- 5g / 1 tsp Fine Sea Salt
- 15g / 1 tbsp Granulated Sugar (for browning)
- 120ml / 0.5 cup Ice Water (filtered)
- 15ml / 1 tbsp Apple Cider Vinegar
Section A: Ingredient Quality Audit:
The most common failure point in pastry infrastructure is the moisture content of the butter. Standard grocery store butter often contains excess water; this prematurely hydrates the flour and triggers gluten development before you even reach the oven. Always opt for European-style butter with higher fat content to ensure the lipid barrier remains intact. If your flour is too high in protein (like bread flour), the crust will be tough rather than tender. If you find yourself stuck with high-protein flour, replace 10% of the volume with cornstarch to interfere with the protein bonding. Finally, check your water temperature. If it is not hovering just above freezing, your butter will melt during the mixing phase, destroying the structural integrity of the layers and ruining your Pie Crust Flakiness.
THE MASTERCLASS
1. Thermal Stabilization of Hardware
Place your mixing bowl and your bench scraper in the freezer for twenty minutes before you begin. Even a warm bowl can raise the temperature of the lipids enough to cause premature emulsification.
Pro Tip: Using a digital scale is non-negotiable here. Volumetric measurements are too imprecise for pastry. Measuring by weight ensures the flour-to-fat ratio is perfectly balanced to prevent a greasy finish.
2. The Dry Phase Integration
Whisk your flour, salt, and sugar together to aerate the mixture. This ensures even distribution of the solutes and prevents "hot spots" of seasoning in the final dough.
Pro Tip: Use a chilled saucier or small metal bowl to hold your measured ice water. The thermal mass of the metal helps keep the liquid at a consistent near-freezing temperature throughout the process.
3. Lipid Encapsulation
Cut your butter into 1cm cubes and toss them into the flour. Use your bench scraper or a pastry cutter to press the fat into the flour until the pieces are the size of walnut halves. Do not overwork the mixture.
Pro Tip: You want distinct, visible chunks of fat. These chunks will render in the oven, creating steam pockets that lift the dough and produce the characteristic layers of Pie Crust Flakiness.
4. Hydration Control
Slowly drizzle the ice water and vinegar mixture over the flour. Use a fork to toss the mixture gently. The goal is to hydrate the flour just enough so that it holds together when squeezed, but still looks shaggy and "unfinished."
Pro Tip: The vinegar acts as a dough conditioner. It lowers the pH, which inhibits gluten formation, ensuring the final product remains tender and short rather than elastic and chewy.
5. The Lamination Fold
Turn the dough onto a cold surface. Use your bench scraper to fold the dough over itself three or four times. This creates "pseudo-lamination" without the labor-intensive process of a puff pastry. Wrap tightly in plastic and chill for at least two hours.
Pro Tip: This resting period allows the moisture to redistribute evenly through the flour particles. It also allows the gluten to relax, which prevents the crust from shrinking when it finally hits the heat of the oven.
Section B: Prep & Timing Fault-Lines:
The "Soggy Bottom" is the ultimate sign of a timing failure. This happens when the filling is added to a raw crust that hasn't been properly "blind baked." If your recipe calls for a moist filling, you must par-bake the crust with pie weights to set the lipid structure before adding the liquid components. Another timing error is over-chilling. If the dough is too cold, the butter will shatter rather than roll out, leading to uneven thickness. If the dough cracks, let it sit at room temperature for five minutes before attempting to roll again.
THE VISUAL SPECTRUM
Section C: Thermal & Visual Troubleshooting:
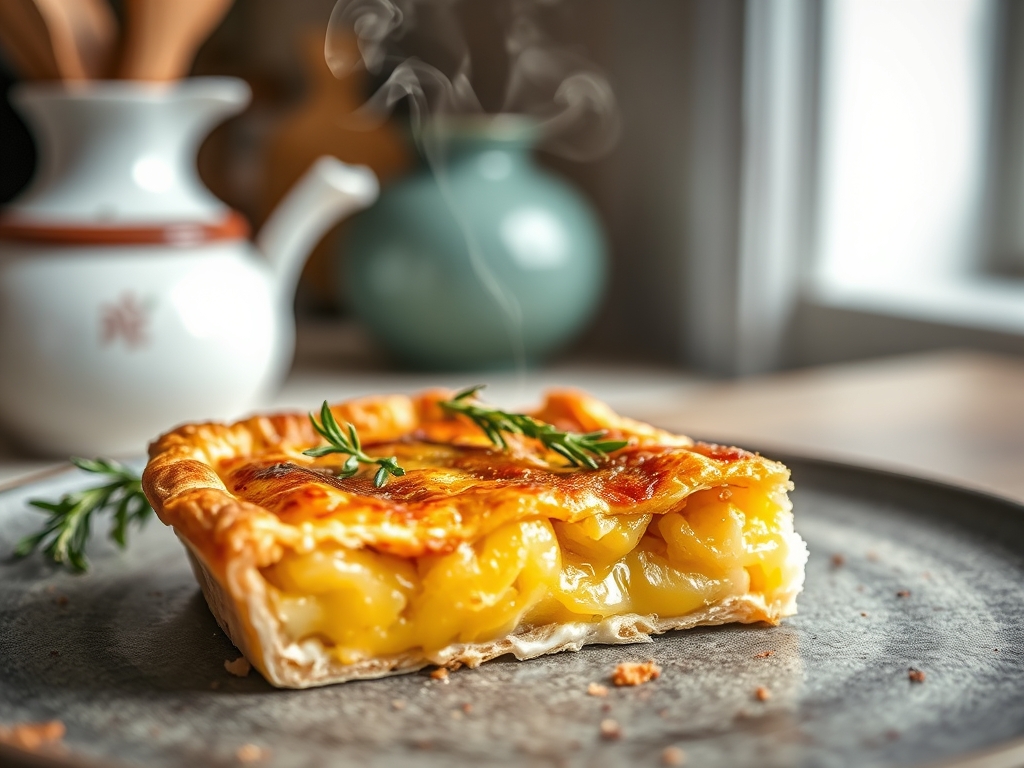
Look closely at the Masterclass photo; notice the deep golden hue and the visible "shards" on the edges. If your crust looks pale and dusty, you likely under-baked it or failed to use an egg wash to promote the Maillard reaction. If the crust looks "melted" or smooth rather than layered, your fat was too warm during the mixing stage. For uneven browning, check your oven's calibration with an external thermometer. Most home ovens have hot spots that can scorch one side of the crust while leaving the other raw. Rotate the pie 180 degrees halfway through the bake to ensure a uniform, piquant finish. If the edges are browning too fast, shield them with aluminum foil to protect the delicate lipid structure while the base finishes.
THE DEEP DIVE
Macro Nutrition Profile
A single serving of this high-performance crust contains approximately 280 calories. The profile is dominated by lipids (18g) and carbohydrates (26g), with a minimal protein count (3g). It is designed for sensory impact rather than caloric restriction.
Dietary Swaps
- Vegan: Replace European butter with a high-quality vegan butter block that has a high melting point. Avoid oil-based tubs as they lack the structural solids needed for flakiness.
- Keto: Substitute flour with a blend of almond flour and xanthan gum. Note that the "shatter" effect will be significantly reduced due to the lack of starch.
- Gluten-Free: Use a 1-to-1 GF flour blend that contains rice flour and potato starch. Increase the chilling time to four hours to help the starches hydrate.
Meal Prep & Reheating Science
To maintain the molecular structure, never reheat pie in a microwave. The agitation of water molecules will turn the lipid barrier into a soggy mess. Use a toaster oven at 300F (150C) to gently re-crisp the layers. For meal prep, the raw dough can be frozen for up to three months. Thaw it in the refrigerator overnight before rolling to keep the butter at the optimal temperature.
THE KITCHEN TABLE
Why is my crust shrinking in the oven?
Shrinkage is caused by over-activated gluten. You likely overworked the dough or didn't let it rest long enough. The proteins are acting like rubber bands and snapping back. Give it more time to relax in the fridge.
Can I use a food processor for this?
Yes, but be careful. It is very easy to over-process the fat into a paste. Pulse only a few times until the butter is the size of peas. If the butter gets too small, you lose the flakiness.
What does the salt actually do?
Salt is not just for flavor; it strengthens the gluten structure just enough to hold the steam pockets. Without it, the crust would be bland and structurally brittle. It provides the necessary contrast to sweet fillings.
My dough is crumbly and won't hold together!
You are under-hydrated. Add ice water one teaspoon at a time. The environment's humidity affects the flour, so the exact water amount can change daily. Use the "squeeze test" to check for cohesion.