The scent of scorched oak and fermented wheat is not just a dinner invitation; it is a siren song for the obsessed. When you slide a disc of dough into a nine hundred degree furnace, you are not merely cooking. You are initiating a violent, beautiful sequence of Pizza Crust Physics that transforms a humble ball of starch into a charred, airy masterpiece. This is the architecture of carbon dioxide trapping. We are looking for the "cornicione," that puffed, leopard-spotted rim that defies gravity and shatters upon impact. To achieve this, we must master the tension between hydration and heat. If your dough is a dense, lifeless slab of cardboard, you have failed the structural integrity test. We are here to audit your process and upgrade your culinary infrastructure. We will manipulate the protein matrix of "00" flour to ensure every bubble of gas is locked within a translucent web of gluten. Prepare for a high-velocity journey into the heart of the oven where thermodynamics meets tradition.
THE DATA MATRIX
| Metric | Specification |
|---|---|
| Prep Time | 20 Minutes (Active) / 24-72 Hours (Fermentation) |
| Execution Time | 90 Seconds |
| Yield | 4 Dough Balls (250g each) |
| Complexity (1-10) | 8 |
| Estimated Cost per Serving | $1.25 |
THE GATHERS
Ingredient Protocol:
- 500g / 3.75 cups High-Protein "00" Flour (12.5% protein minimum)
- 325ml / 1.35 cups Filtered Water (Room temperature, 21C / 70F)
- 15g / 2.5 tsp Sea Salt (Fine grain)
- 1g / 0.25 tsp Active Dry Yeast
- 5ml / 1 tsp Extra Virgin Olive Oil (Optional for home oven elasticity)
Section A: Ingredient Quality Audit:
If your flour lacks the necessary protein content, the gluten network will collapse under the pressure of rapid steam expansion. This results in a flat, gummy crust. To fix this, ensure you are using genuine "00" flour, which is milled to a powder-like consistency but retains high strength. If your water is heavily chlorinated, it will inhibit yeast activity. Use a charcoal filter or bottled spring water to ensure the yeast can aerate the dough effectively. If your salt is too coarse, it will not dissolve evenly, leading to "hot spots" of fermentation where the yeast is inhibited in some areas and overactive in others. Always use a digital scale for precision; volume measurements are the enemy of consistency in Pizza Crust Physics.
THE MASTERCLASS
Step 1: The Autolyse and Hydration
Begin by whisking your yeast into the water until fully dissolved. Gradually add 75% of your flour to the liquid, mixing with a sturdy spatula until a viscous slurry forms. Cover and let rest for twenty minutes. This allows the flour to fully hydrate before the mechanical work begins.
Pro Tip: This resting phase allows enzymes to begin breaking down starches into simple sugars, which will later infuse the crust with deep flavor and facilitate the Maillard reaction. Use a saucier or small bowl to bloom the yeast if you are unsure of its viability.
Step 2: Structural Integration and Kneading
Add the remaining flour and the sea salt. Turn the dough onto a clean surface and use a bench scraper to manage the stickiness. Knead for ten minutes until the surface is smooth and passes the "windowpane test," where a small piece can be stretched thin enough to see light through it without tearing.
Pro Tip: Do not add excess flour during kneading. The stickiness is essential for high-heat expansion. A digital scale ensures your hydration remains at precisely 65%, which is the sweet spot for domestic and professional ovens alike.
Step 3: The Cold Fermentation Protocol
Place the dough in a lightly oiled container and seal it. Leave it at room temperature for two hours, then transfer it to the refrigerator for 24 to 72 hours. This slow fermentation allows the carbon dioxide to develop slowly, creating smaller, more resilient bubbles.
Pro Tip: Cold temperatures slow down yeast metabolism but allow lactic acid bacteria to flourish. This creates the piquant tang associated with world-class Neapolitan crusts.
Step 4: Balling and Final Proofing
Divide the cold dough into four equal portions using your bench scraper. Tighten each portion into a smooth ball by pulling the surface tension toward the bottom. Place them in individual containers for four hours at room temperature before baking.
Pro Tip: Surface tension is the "skin" of your pizza. Without a tight outer layer, the carbon dioxide will escape during the bake rather than being trapped to create that airy lift.
Step 5: The High-Heat Launch
Stretch the dough by hand, never a rolling pin, to preserve the internal gas pockets. Launch onto a preheated stone or steel at the highest possible temperature. The goal is "oven spring," where the water turns to steam and inflates the dough instantly.
Pro Tip: Use a perforated peel to shed excess flour. Excess flour on the bottom of the crust will burn and create a bitter, acrid flavor that ruins the render of the fats in your cheese.
Section B: Prep & Timing Fault-Lines:
The most common human error is rushing the final proof. If the dough is still cold when it hits the oven, you will suffer from "dense-rim syndrome." The center will be soggy while the outside remains pale. Ensure the dough reaches at least 20C (68F) internally before stretching. Another fault-line is over-handling. If you press the air out of the edges during stretching, you have effectively killed the Pizza Crust Physics. Handle the dough like a fragile balloon.
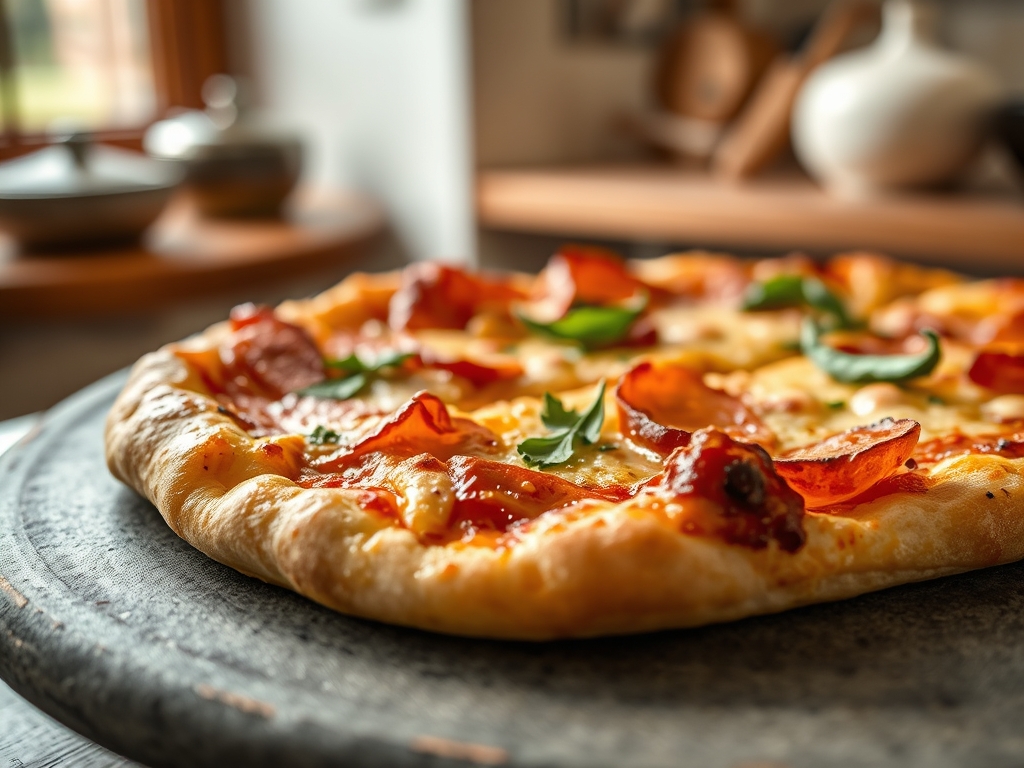
THE VISUAL SPECTRUM
Section C: Thermal & Visual Troubleshooting:
Look at the Masterclass photo above. Notice the "leopard spotting," those small, charred black circles against a golden-white background. If your crust is a uniform, dull brown, your oven temperature is too low or your dough is over-proofed and has run out of sugars for caramelization. If the crust is stark white with no color, you likely forgot the salt or used "dead" yeast. To fix uneven browning, rotate the pizza 180 degrees halfway through the bake using a turning peel. If the texture is tough and leathery rather than crisp and light, you likely over-kneaded or used a flour with too much protein, such as bread flour, without adjusting the hydration.
THE DEEP DIVE
Macro Nutrition Profile:
A single 250g dough ball provides approximately 600 calories, 120g of carbohydrates, 20g of protein, and 2g of fat. While high in carbs, the long fermentation process breaks down much of the gluten and phytic acid, making it significantly easier to digest than "quick" doughs.
Dietary Swaps:
- Vegan: This protocol is naturally vegan. Ensure your toppings follow suit.
- Gluten-Free: Replace "00" flour with a high-quality GF pizza blend containing xanthan gum. Increase hydration by 10% as GF flours are highly absorbent.
- Keto: Use a cauliflower and almond flour base. Note that you will lose the carbon dioxide trapping capability as there is no gluten matrix.
Meal Prep & Reheating Science:
To maintain molecular structure, never microwave leftover pizza. This turns the starch into a rubbery mess. Instead, use a dry skillet over medium heat to re-crisp the bottom, then add a teaspoon of water to the pan and cover with a lid for thirty seconds. The steam will re-hydrate the cheese without compromising the crust's structural integrity.
THE KITCHEN TABLE
Why is my dough snapping back when I stretch it?
The gluten is too tight. This happens if the dough is too cold or hasn't rested long enough after balling. Let it sit at room temperature for another thirty minutes to allow the protein strands to relax.
Can I use All-Purpose flour instead of "00"?
You can, but the texture will be heavier. All-purpose flour has a different ash content and granulation. It will not produce the same delicate, shatter-crisp "00" finish but will suffice for a standard home-style pie.
Why does my crust have large, burnt bubbles?
This is usually caused by "cold fermentation bubbles" that were not popped before baking. While some bubbling is good, huge ones burn quickly. Gently press down any massive air pockets before the dough enters the oven.
How do I get leopard spotting in a 500-degree oven?
Use a pizza steel instead of a stone. Steels conduct heat much faster, mimicking the intense thermal mass of a wood-fired oven. Additionally, adding a pinch of sugar or malt powder to your dough will accelerate browning.