Listen to that sound. It is not just a crunch; it is the structural collapse of seven hundred and twenty-nine distinct layers of butter-infused architecture. This is the sound of a successful Puff Pastry Lamination, a process where physics and chemistry collide in a high-stakes dance of temperature and tension. We are moving beyond the realm of simple baking into the world of culinary engineering. When you bite into a properly laminated pastry, you are experiencing the violent expansion of water vapor trapped between sheets of fat, forcing the dough to aerate and rise into a golden, shattered monument of indulgence. If your pastry feels like a leaden brick or a greasy sponge, you have failed the audit. But do not despair. We are here to recalibrate your technique, optimize your thermal management, and ensure that every turn of the rolling pin contributes to a masterpiece of stratification. Prepare to transform humble flour and butter into a shimmering, multi-layered marvel that defies the laws of gravity.
THE DATA MATRIX
| Metric | Specification |
|---|---|
| Prep Time | 45 Minutes |
| Execution Time | 6 Hours (Includes Chilling) |
| Yield | 1.2kg Finished Dough |
| Complexity (1-10) | 9 |
| Estimated Cost per Serving | $0.85 |
THE GATHERS
Ingredient Protocol:
- 500g / 4 cups All-Purpose Flour (High protein content preferred)
- 10g / 2 tsp Fine Sea Salt
- 250ml / 1 cup Ice-Cold Water
- 50g / 3.5 tbsp Unsalted Butter (Melted and cooled for the detrempe)
- 450g / 2 cups European-Style Butter (82% fat minimum for the beurrage)
- Extra flour for dusting the work surface
Section A: Ingredient Quality Audit:
The primary failure point in Puff Pastry Lamination is often the water content of the butter. Standard grocery store butter contains too much moisture; this creates steam too early and softens the dough prematurely. Technical Fix: Source "European-Style" butter with a higher fat percentage. If the flour is too low in protein, the gluten network will shatter under the pressure of the rising steam. Technical Fix: Use a flour with at least 11.5% protein to ensure the layers remain viscous and elastic during the rolling process. If your salt is too coarse, it will tear the delicate gluten sheets. Technical Fix: Always dissolve salt in the water before mixing to ensure total integration.
THE MASTERCLASS

Step 1: Constructing the Detrempe
Mix the flour, salt, melted butter, and water until a rough dough forms. Do not overwork it; we want to develop just enough gluten to hold the structure without making it tough. Shape into a square, wrap in plastic, and chill for at least two hours.
Pro Tip: Use a digital scale for the water. Volumetric measurements are too imprecise for high-level lamination. Precise hydration ensures the dough remains pliable enough to stretch without snapping.
Step 2: Preparing the Beurrage
Place your cold European butter between two sheets of parchment paper. Use a heavy rolling pin to pound it into a flat, even 7-inch square. It must be the same consistency as the dough: cold but malleable.
Pro Tip: The butter must not be oily. If it begins to render or look shiny, return it to the fridge immediately. A bench scraper is essential here to keep the edges sharp and the square uniform.
Step 3: The Lock-In
Roll your chilled dough into an 11-inch square. Place the butter block diagonally in the center. Fold the corners of the dough over the butter like an envelope, sealing the edges tightly. You have now created the foundation of your lamination.
Pro Tip: Use your bench scraper to ensure the seams are perfectly fused. Any gaps will allow butter to leak out, ruining the internal pressure required for the rise.
Step 4: The First Turns
Roll the dough into a long rectangle. Fold it into thirds like a letter. This is a "Single Turn." Rotate the dough 90 degrees and repeat the process. Wrap and chill for one hour. You must perform a total of six turns to reach the golden standard of layering.
Pro Tip: Use a digital thermometer to check the surface temperature of the dough. It should stay between 15 and 18 degrees Celsius. If it gets warmer, the butter will melt into the flour, turning your lamination into a standard shortcrust.
Step 5: The Final Rest and Bake
After the sixth turn, chill the dough for at least four hours (or overnight). Roll to your desired thickness, cut with sharp tools, and bake at a high initial temperature (200C / 400F) to trigger the flash-evaporation of the water in the butter.
Pro Tip: Do not use a dull knife to cut the dough. A dull blade will "smear" the layers together, effectively welding them shut and preventing the rise. Use a sharp bench scraper or a professional pastry wheel.
Section B: Prep & Timing Fault-Lines:
The most common human error is impatience. If you skip the resting periods, the gluten will be too tense, causing the dough to shrink and warp in the oven. Technical Fix: If the dough resists rolling or springs back, stop immediately. Cover it and chill for 20 minutes to allow the protein strands to relax. Another fault is uneven pressure. If you press too hard on one side, the butter will be pushed out of the layers. Technical Fix: Always start rolling from the center outwards to maintain an even distribution of fat.
THE VISUAL SPECTRUM
Section C: Thermal & Visual Troubleshooting:
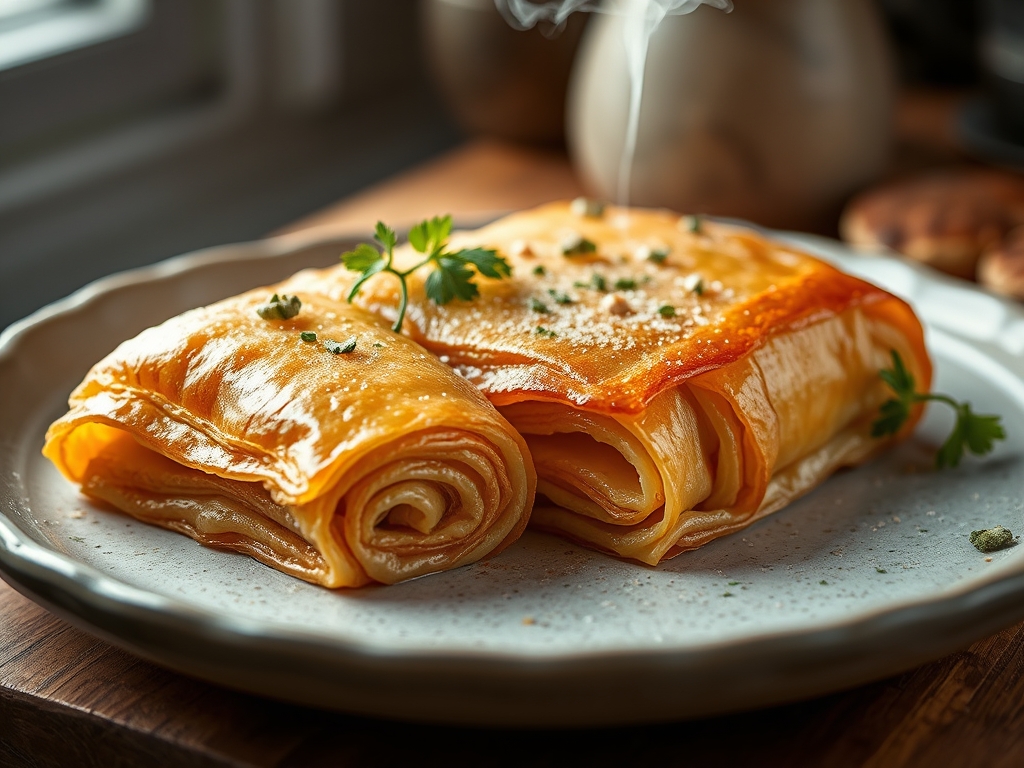
Look at the Masterclass photo above. Notice the distinct, shattered edges and the deep, mahogany-gold hue. If your pastry looks pale and "doughy," you likely lacked the initial heat blast required to infuse the layers with steam. Solution: Calibrate your oven with an external thermometer; built-in sensors are notoriously inaccurate. If the pastry has "slumped" or leaked a pool of oil, the butter was too warm before it hit the oven. Solution: Always perform a "flash chill" by putting the shaped pastry in the freezer for 10 minutes before baking. If the top is dark but the center is raw, the Maillard reaction is happening too fast. Solution: Tent the pastry with foil and lower the heat by 10 degrees to finish the internal cook.
THE DEEP DIVE
Macro Nutrition Profile:
Puff pastry is an energy-dense substrate. A standard 100g serving contains approximately 550 calories, 35g of fat, and 50g of carbohydrates. It is high in saturated fats due to the butter volume, which provides the structural integrity and mouthfeel.
Dietary Swaps:
- Vegan: Replace butter with a high-quality vegan block fat (look for high stearic acid content). Avoid soft margarines as they lack the melting point stability for lamination.
- Gluten-Free: Use a high-quality 1-to-1 GF flour blend with added xanthan gum to provide the elasticity usually provided by gluten.
- Keto: This is extremely difficult due to the lack of starch. Use almond flour and egg white powders, but expect a significantly lower rise.
Meal Prep & Reheating Science:
To maintain the molecular structure, never microwave puff pastry. The radiation agitates water molecules throughout the dough, causing the fat to liquify and the starch to become rubbery. Instead, reheat in a 175C (350F) oven for 5-8 minutes. This re-crisps the outer layers and restores the internal air pockets.
THE KITCHEN TABLE
Why did my pastry shrink in the oven?
You likely over-developed the gluten or failed to let the dough rest. When gluten is stressed, it acts like a rubber band. Always give your dough at least 30 minutes of fridge time after the final roll before cutting.
Can I use salted butter for the beurrage?
Technically yes, but it is risky. Salted butter has a higher water content and varies in salinity. Using unsalted butter allows you to control the seasoning and ensures a more stable fat-to-water ratio for the lamination process.
My layers are merging together. What happened?
The butter became too soft and was absorbed by the flour. This usually happens in warm kitchens. Keep your marble slab or countertop cold, and do not hesitate to chill the dough between every single turn if necessary.
How long does the finished dough last?
Raw laminated dough stays fresh in the fridge for 2 days. For longer storage, wrap it tightly in multiple layers of plastic and freeze for up to 3 months. Thaw overnight in the fridge before using to maintain temperature.