Welcome to the temple of thermodynamics where we transform a stubborn, collagen-dense pectoral muscle into a trembling masterpiece of culinary engineering. We are not just cooking; we are conducting a structural audit of bovine connective tissue. Beef Brisket Smoking is the ultimate test of a pitmaster's patience and technical precision. It is a high-stakes game of moisture management and thermal regulation. Imagine the scene: a massive slab of USDA Prime beef, obsidian-black on the exterior with a crust so brittle it crackles under the blade, yielding to reveal a neon-pink smoke ring and fibers that pull apart with the slightest suggestion of force. The aroma is a violent collision of oak smoke, rendered tallow, and the deep, umami-rich scent of the Maillard reaction pushed to its absolute limit. If you are looking for a quick weeknight meal, turn back now. This is a marathon of molecular transformation where we force tough proteins to surrender their rigidity and melt into a viscous, gelatinous luxury that coats the palate and haunts the memory.
THE DATA MATRIX
| Metric | Specification |
|---|---|
| Prep Time | 45 Minutes |
| Execution Time | 12 to 16 Hours |
| Yield | 10 to 12 Servings |
| Complexity (1-10) | 9 |
| Estimated Cost per Serving | $6.50 – $8.50 |
THE GATHERS
Ingredient Protocol:
- 1 Whole Packer Brisket (6.8kg / 15 lbs)
- Coarse Kosher Salt (60g / 0.25 cup)
- 16-Mesh Black Pepper (60g / 0.25 cup)
- Granulated Garlic (15g / 1 tbsp)
- Distilled Water for Spritz (500ml / 2 cups)
- Apple Cider Vinegar (250ml / 1 cup)
- Unsalted Cultured Butter for Resting (115g / 0.5 cup)
Section A: Ingredient Quality Audit:
The primary failure point in Beef Brisket Smoking is selecting a "Select" grade cut. These lack the intramuscular marbling required to survive a fifteen-hour thermal assault. If your brisket looks lean, it will finish like a piece of dry cedar. The fix is a "Choice" or "Prime" grade brisket with a thick, uniform fat cap. If you are stuck with a lean cut, you must infuse moisture via a phosphate-based injection using a professional meat injector. Another common error is using table salt. The fine grains pack too tightly, leading to an over-salted exterior. Always use coarse Kosher salt to ensure the proper surface-area-to-volume ratio for crust formation.
THE MASTERCLASS
1. The Aerodynamic Trim
Place the cold brisket on a stable surface and use a sharp boning knife to remove the hard "deckle" fat and square the edges. Aim for a streamlined, aerodynamic shape that allows smoke to flow over the meat without turbulence. Trim the fat cap to a uniform 6mm thickness.
Pro Tip: Cold fat is easier to manipulate. Keep the protein refrigerated until the moment of trimming to ensure clean, surgical cuts. This prevents the fat from smearing, which would otherwise inhibit smoke penetration.
2. The Rub Application
Combine your salt, pepper, and garlic in a stainless steel bowl. Apply the seasoning generously from at least 30cm above the meat to ensure an even distribution. Use a digital scale to ensure your salt-to-pepper ratio is precise; consistency is the hallmark of a professional audit.
Pro Tip: The 16-mesh pepper is critical. These large flakes create "nooks and crannies" on the surface, increasing the surface area for smoke particles to adhere to, which eventually builds the "bark."
3. Thermal Equilibrium and Ignition
Preheat your offset smoker or pellet grill to 107 degrees Celsius (225 degrees Fahrenheit). Use a dual-probe digital thermometer to monitor both the ambient pit temperature and the internal temperature of the thickest part of the brisket flat.
Pro Tip: Stable convection is more important than raw heat. Ensure your exhaust dampener is wide open to prevent "stale" smoke from creosoting the meat, which creates a bitter, acrid flavor profile.
4. The Spritz and the Stall
Once the internal temperature reaches 74 degrees Celsius (165 degrees Fahrenheit), the meat will enter "the stall." Evaporative cooling on the surface will stop the internal temperature from rising. Use a spray bottle to infuse the surface with your water and vinegar mixture every 60 minutes.
Pro Tip: Spritzing cools the surface and attracts smoke. However, do not over-spritz the fat cap, as this can prevent the fat from properly rendering into a viscous liquid state.
5. The Crutch and the Render
When the bark is set and dark, wrap the brisket tightly in peach butcher paper. This allows the meat to breathe while accelerating the internal temperature past the stall. Return it to the heat until the internal temperature hits 95 degrees Celsius (203 degrees Fahrenheit).
Pro Tip: Butcher paper is superior to foil because it preserves the texture of the bark. Foil creates a "steaming" environment that can turn your beautiful crust into a soggy mess.
6. The Long Rest
Remove the brisket and place it in an insulated cooler. Let it rest for a minimum of three hours. This allows the muscle fibers to relax and reabsorb the rendered tallow and moisture.
Pro Tip: Use a bench scraper to clean your cutting board during the rest phase. A clean workspace ensures that when you finally slice, no stray salt grains or dried bits interfere with the presentation of the pristine meat.
Section B: Prep & Timing Fault-Lines:
The most common timing error is pulling the meat based on time rather than feel. Every cow is different. If the thermometer probe does not slide into the meat like it is entering a jar of warm peanut butter, it is not done. If you find yourself behind schedule, do not crank the heat; instead, use the "Texas Crutch" (foil wrap) to bypass the stall more aggressively, though you will sacrifice some bark integrity.
THE VISUAL SPECTRUM
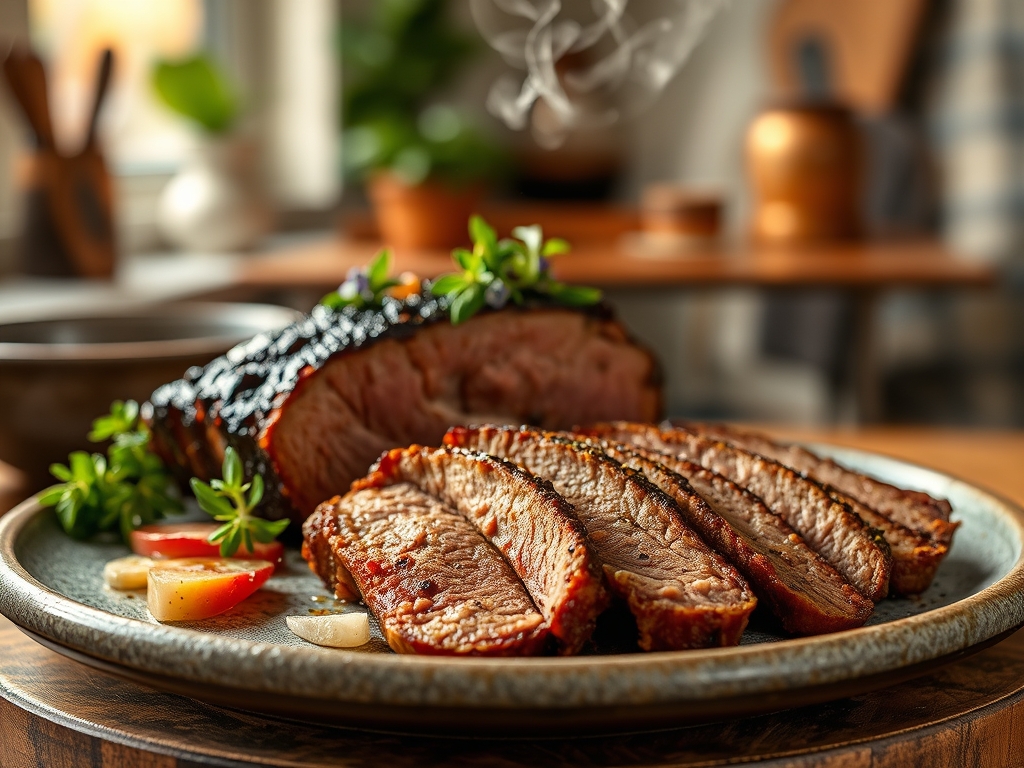
Section C: Thermal & Visual Troubleshooting:
Look at the Masterclass photo above. Notice the deep, mahogany-to-black exterior. If your brisket looks gray or light brown, you likely had too much moisture in the cooking chamber or insufficient airflow. A dull, matte finish suggests the meat is dry; a glossy, shimmering surface indicates successful fat rendering. If the smoke ring is absent, you may have put the meat in the smoker after it had already reached room temperature. Cold meat absorbs nitric oxide more effectively, creating that iconic pink band. If your slices crumble rather than fold over a finger, the brisket is overcooked and the connective tissue has completely disintegrated.
THE DEEP DIVE
Macro Nutrition Profile:
A standard 100g serving of smoked brisket contains approximately 250 calories, 18g of fat, and 22g of protein. It is a zero-carb powerhouse, though the high saturated fat content means it should be audited with moderation in mind.
Dietary Swaps:
- Vegan: Replace the brisket with a whole "head" of cauliflower or a large jackfruit, using the same dry rub and a shorter smoking window of 2 hours.
- Keto/GF: This recipe is naturally Keto and Gluten-Free. Ensure your granulated garlic does not contain anti-caking agents like cornstarch.
Meal Prep & Reheating Science:
To maintain the molecular structure during reheating, do not use a microwave. The high-frequency waves agitate water molecules, causing them to steam the meat from the inside out, which toughens the protein. Instead, vacuum-seal slices with a tablespoon of beef broth and reheat in a 75-degree Celsius water bath (sous-vide) for 45 minutes.
THE KITCHEN TABLE
Why is my brisket dry even though it's fatty?
You likely undercooked it. If the collagen hasn't fully converted into gelatin, the meat feels dry and tough. The "probe tender" test is your only reliable metric for success.
Can I use a different wood for smoking?
Oak and Hickory are the gold standards for Beef Brisket Smoking. Fruitwoods like apple or cherry are too delicate for the heavy beef flavor and may fail to provide the necessary chemical reaction for a deep bark.
What is the "smoke ring" exactly?
It is a chemical reaction between nitrogen dioxide in the smoke and myoglobin in the meat. It has no impact on flavor but serves as a visual badge of honor for low and slow cooking.
How do I slice it for the best texture?
Always slice against the grain. The brisket has two muscles with grains running in different directions. Separate the "point" from the "flat" before slicing to ensure every piece is tender and easy to chew.