Imagine a structural engineer being asked to build a skyscraper using nothing but air and water. That is the fundamental challenge of the pastry world. We are not just making dessert; we are constructing a high-performance architectural marvel known as Meringue Stability. When you crack that first egg, you are initiating a violent mechanical intervention. You are forcing globular proteins to uncoil and stretch until they resemble a net of microscopic scaffolding. This is the viscous reality of the kitchen. If your structural integrity fails, you do not just get a flat cookie; you get a weeping, collapsed mess that signals a total failure of the culinary infrastructure. We are looking for that iridescent, pearlescent sheen that screams professional execution. We want peaks so sharp they could cut glass and a texture that feels like biting into a cloud held together by sheer willpower. This is a high-stakes game of molecular physics where sugar acts as the mortar and air is the brick. Welcome to the audit of the century.
THE DATA MATRIX
| Metric | Specification |
|---|---|
| Prep Time | 15 Minutes |
| Execution Time | 90 Minutes |
| Yield | 24 Large Rosettes |
| Complexity (1-10) | 7 |
| Estimated Cost per Serving | $0.22 |
THE GATHERS
Ingredient Protocol:
- 150g / 5 Large Egg Whites (Room Temperature)
- 300g / 1.5 Cups Superfine Granulated Sugar
- 5ml / 1 Teaspoon Cream of Tartar
- 2.5ml / 0.5 Teaspoon Pure Vanilla Extract
- 1g / 0.25 Teaspoon Fine Sea Salt
Section A: Ingredient Quality Audit:
The primary failure point in most meringue protocols is the presence of lipids. If your mixing bowl has even a microscopic film of fat, the proteins will refuse to bond. Always wipe your equipment with lemon juice or white vinegar before starting. Furthermore, if your sugar is too coarse, it will not dissolve into the protein matrix. This leads to "weeping," where liquid seeps out of the finished structure. If you only have standard granulated sugar, run it through a high-speed blender for ten seconds to achieve the necessary grit-free profile. Finally, ensure your eggs are not too fresh. Paradoxically, eggs that have sat in the refrigerator for three to five days have slightly thinner whites that aerate more easily and achieve higher volume than farm-fresh counterparts.
THE MASTERCLASS
Step-by-Step Execution:
1. The Mechanical Denaturation Phase
Place your room-temperature egg whites into a stainless steel bowl. Use a digital scale to ensure your ratios are exact to the gram. Begin whisking on low speed to break the protein bonds. Once the liquid becomes foamy, add the cream of tartar and salt.
Pro Tip: The cream of tartar acts as a chemical stabilizer. It lowers the pH of the whites, which prevents the proteins from over-coagulating and becoming brittle. Use a professional stand mixer to maintain a consistent RPM that a hand whisk simply cannot replicate.
2. The Incremental Saturation Phase
Increase the mixer speed to medium-high. Begin adding your superfine sugar one tablespoon at a time. Do not dump the sugar in all at once. You are looking to infuse the crystals into the moisture of the egg whites without weighing down the developing air bubbles.
Pro Tip: This is where Meringue Stability is won or lost. If you add sugar too fast, you crash the foam. If you add it too slow, you overwork the proteins. Use a bench scraper to ensure no stray sugar crystals are clinging to the sides of the bowl; every grain must be integrated.
3. The Stiff Peak Verification
Continue whisking until the mixture is thick, glossy, and holds a sharp peak when the whisk is lifted. Rub a small amount of the mixture between your thumb and forefinger. It should feel completely smooth. If it feels gritty, continue whisking for another minute.
Pro Tip: Use a saucier or a small pot of simmering water to create a double boiler if you are performing a Swiss method. Heating the whites and sugar to 160 degrees Fahrenheit (71 Celsius) ensures total sugar dissolution and pasteurization, creating a much denser molecular bond.
4. The Thermal Setting Phase
Pipe the mixture onto a parchment-lined tray. Place in an oven preheated to 200 degrees Fahrenheit (93 Celsius). You are not "baking" in the traditional sense; you are dehydrating. This process should take approximately 90 minutes depending on the ambient humidity of your kitchen.
Pro Tip: Use a silicone baking mat for the cleanest release. The low and slow thermal application allows the moisture to evaporate while the sugar structure hardens. If the oven is too hot, the sugar will caramelize and turn brown, ruining the pristine aesthetic.
Section B: Prep & Timing Fault-Lines:
The most common human error is impatience during the cooling phase. If you pull the meringues out into a cold kitchen immediately, the sudden temperature drop causes the internal air pockets to contract faster than the sugar walls can support. This results in cracking. Always turn off the oven and crack the door open, allowing the meringues to reach room temperature gradually over the course of an hour. Additionally, never attempt this protocol on a rainy day. High humidity means the sugar will pull moisture from the air, turning your crisp masterpiece into a sticky, tacky disaster within minutes.
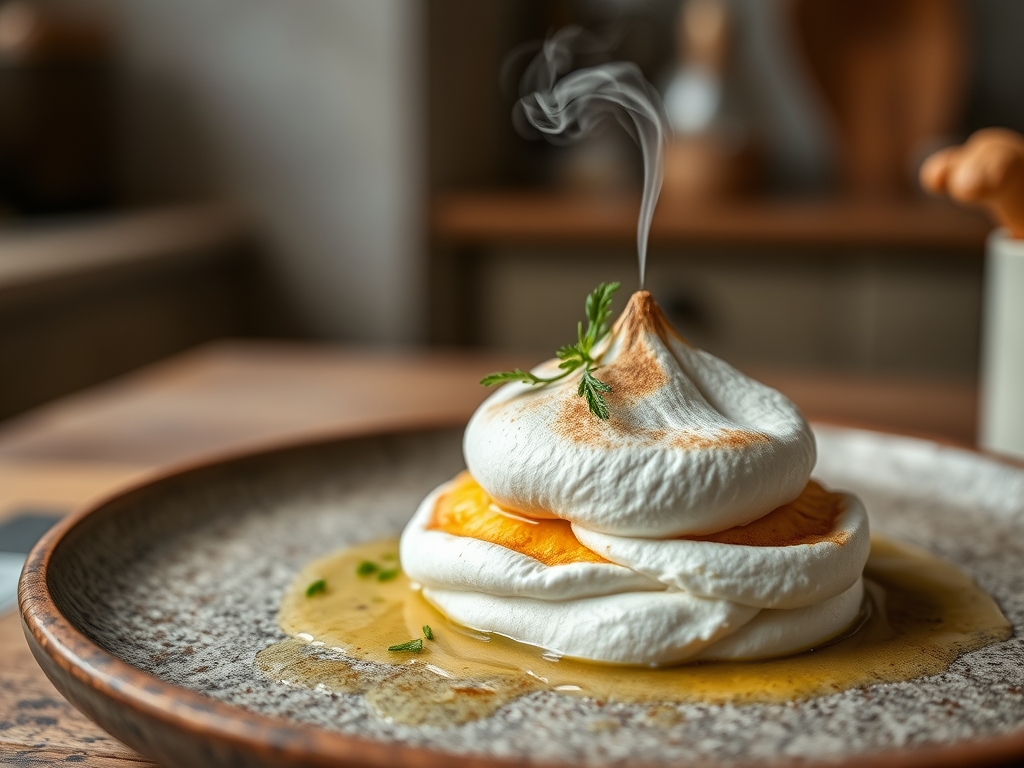
THE VISUAL SPECTRUM
Section C: Thermal & Visual Troubleshooting:
Look closely at the reference image provided above. Notice the sharp, defined ridges and the lack of any golden-brown discoloration. If your meringues look "toasted," your oven calibration is off; use an independent oven thermometer to verify the internal temp. If the base of the meringue looks wet or syrupy, you have experienced "beading," which is a sign of undissolved sugar. To fix this, ensure you are using the superfine sugar mentioned in the audit. If the texture is hollow or shatters into dust, you have over-baked. The ideal visual cue is a matte, eggshell finish that feels firm to the touch but retains a slight, melt-in-the-mouth interior.
THE DEEP DIVE
Macro Nutrition Profile:
Meringues are essentially fat-free. A standard serving contains approximately 60 calories, 15g of carbohydrates (all from sugar), and 1g of protein. While high in glycemic index, they are a "clean" dessert in terms of ingredient simplicity.
Dietary Swaps:
For a vegan alternative, replace the egg whites with aquafaba (the liquid from a can of chickpeas). The proteins and starches in aquafaba mimic egg whites with surprising accuracy, though they require a longer whisking time to achieve Meringue Stability. For a Keto version, use powdered erythritol, though be warned: the cooling effect of sugar alcohols can alter the sensory experience.
Meal Prep & Reheating Science:
You cannot "reheat" a meringue. Once the molecular structure is set and then compromised by moisture, it is gone. Store finished meringues in an airtight glass container with a desiccant pack. If they soften, you can attempt to "refresh" them in a 175-degree oven for 10 minutes to drive out surface moisture, but the internal lattice will never be as crisp as the initial bake.
THE KITCHEN TABLE
Why did my meringue turn yellow?
Your oven temperature was likely too high. Sugar begins to caramelize at higher heats. To maintain a pure white finish, keep the temperature at or below 200 degrees Fahrenheit and use a middle rack to avoid direct heat.
Can I use a plastic bowl?
Avoid plastic at all costs. Plastic is lipophilic, meaning it clings to fats and oils even after washing. This invisible residue will sabotage your protein denaturation. Stick to stainless steel or copper for maximum volume and stability.
How do I stop the weeping?
Weeping is caused by undissolved sugar or under-beating. Ensure you add sugar gradually and whisk until the mixture is no longer gritty. Adding a small amount of cornstarch (5g) can also help absorb excess moisture during the baking process.
Why are my peaks drooping?
This is a sign of under-whisking or adding sugar too early. The proteins need to form a stable foam before they can support the weight of the sugar. Ensure you reach "soft peaks" before the first spoonful of sugar hits the bowl.